Tuesday, April 30, 2013

April Showers Brings Flutterbug Plaque


April
April is a very special month for me.  It was the month in which I first became a mother.  I have two beautiful daughters both born in April and they are certainly April Showers, full of lots of love and joy.  They are each distinctly different, but loving in many ways.  
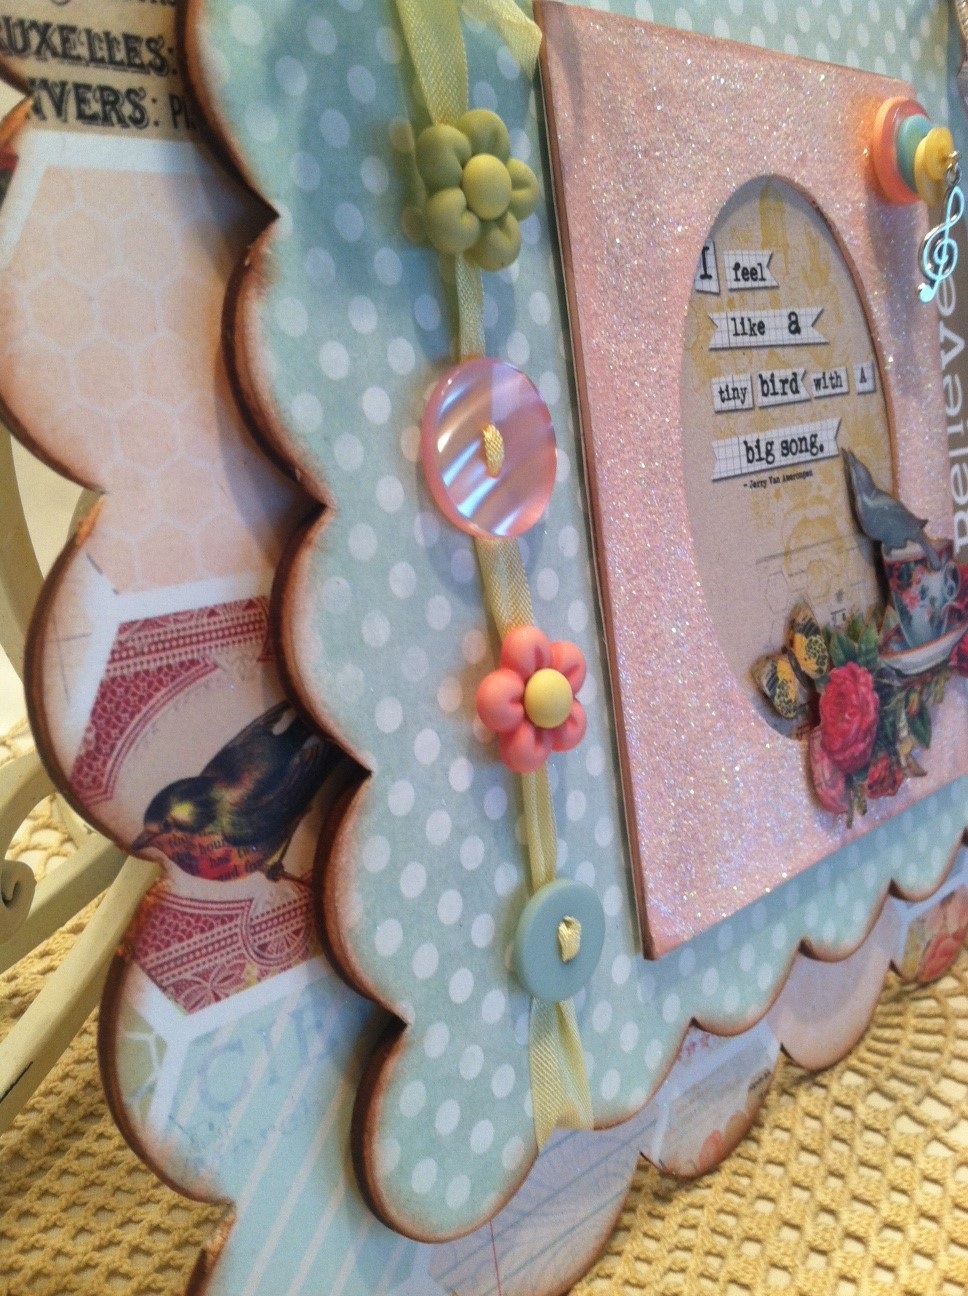
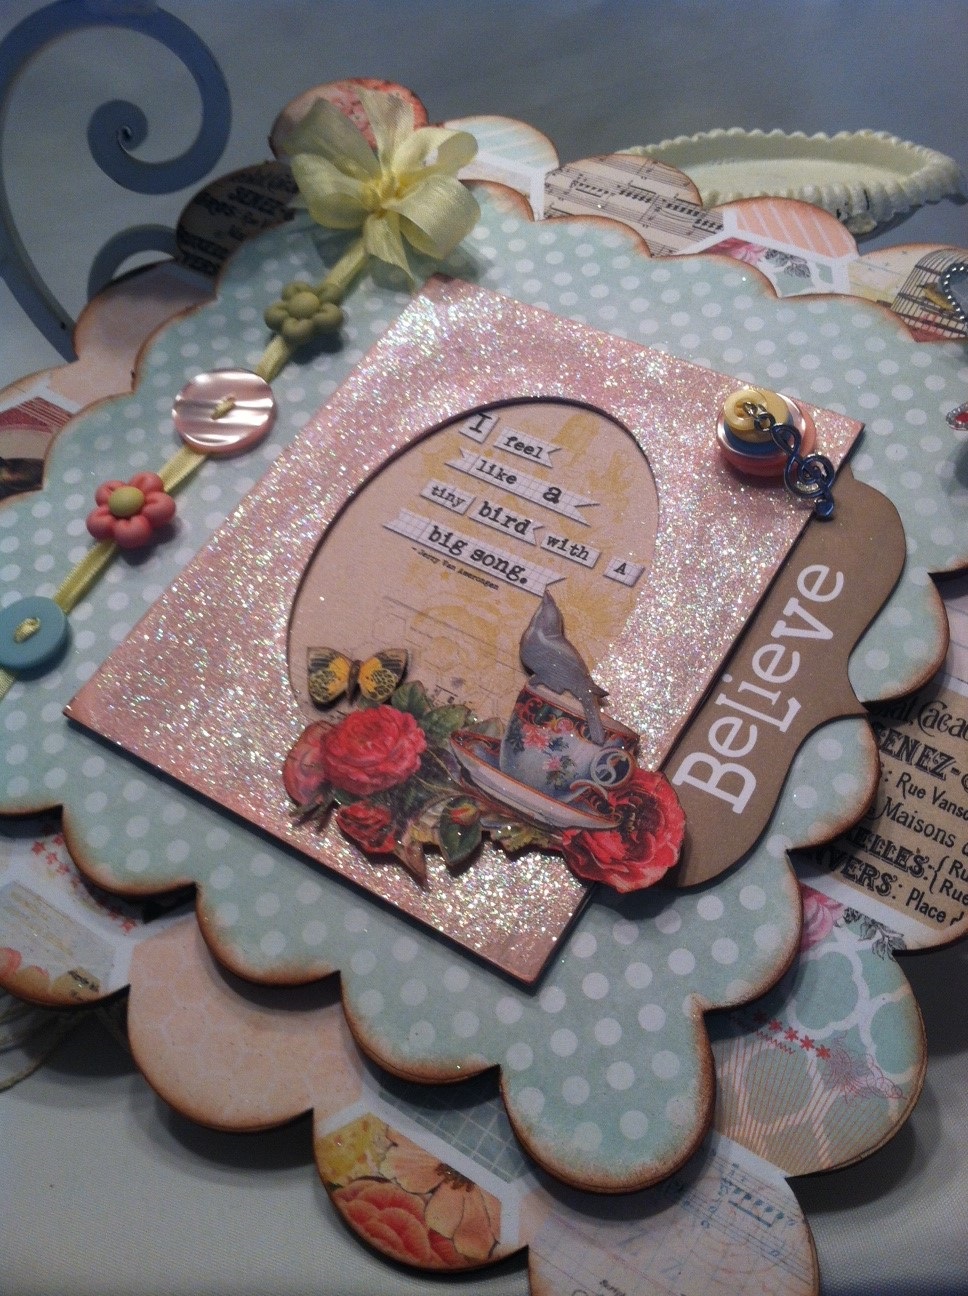
I created this Flutterbug Plaque for my Karla "K" who turned 17 this April and I wanted her to know that she can always do whatever she sets her heart to do as long as she "BELIEVES"!!!!!
So, as you can see there are so many April Shower surprises for me.  I made my plaque using various supplies and the wood plaques are from ADORNit!
My Springtime Flutterbug Medley Wall plaque is cute for any young lady and very easy to make!
april2
April4

Material used:

Buttons Galore & More Products used:

Directions:

Once  you have gathered all your supplies, you can begin to transform the scalloped frames into something totally cute and ready for Spring.
April instructional material
STEP ONE:
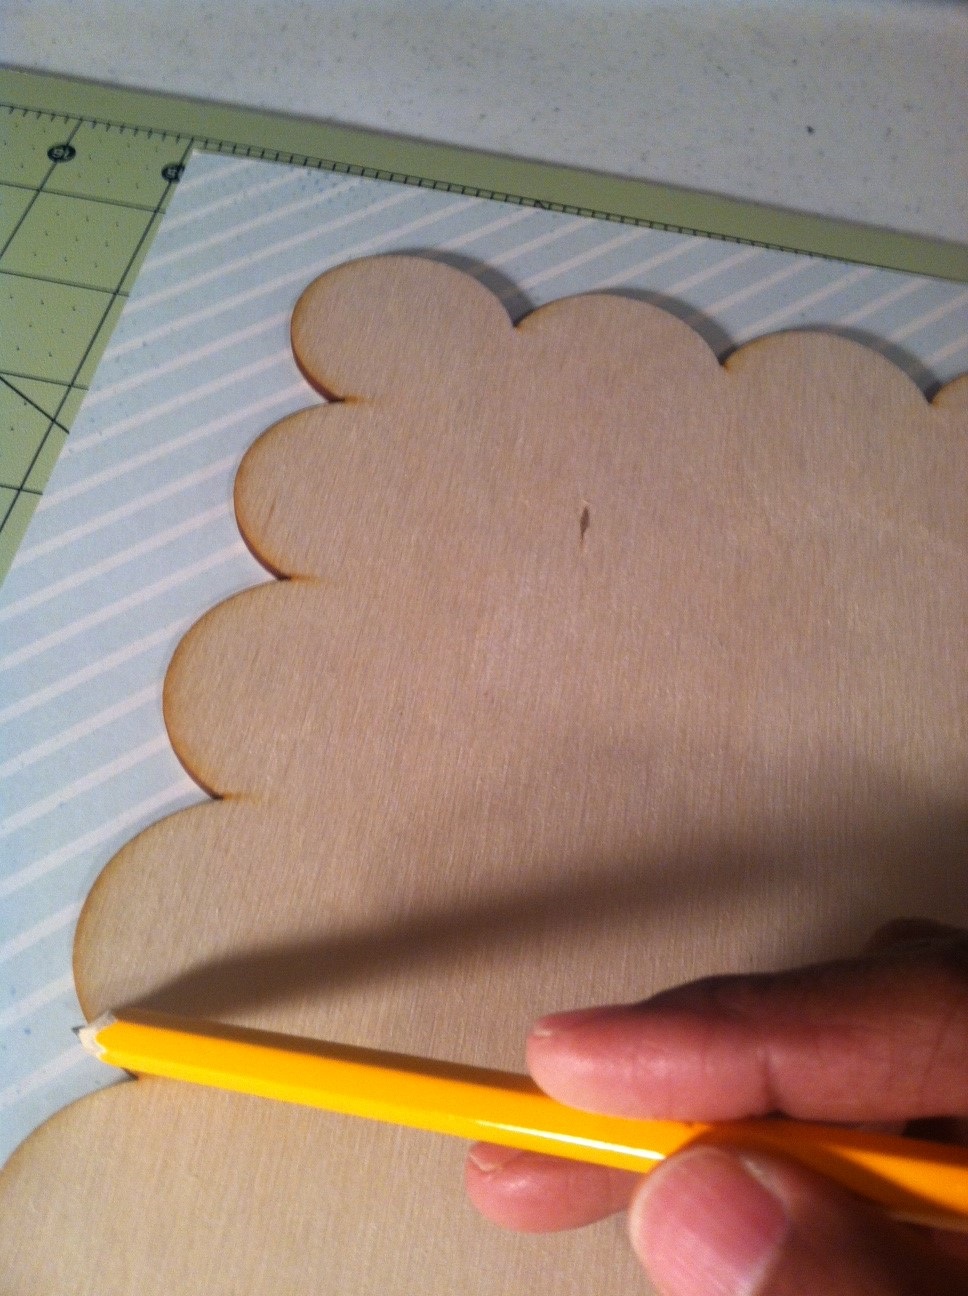
Start by tracing the large scalloped wood frame into you paper of choice.    Be sure to trace on  the back side of the paper.
instructional material3
Once you have both frames the large and the small scalloped frames traced like you see above you can begin to cut.
STEP TWO:
Cut the frames that you just traced and you can use an Xacto knife for the harder to cut places or your Friskar Scissors.
Instructional Material 4
STEP THREE:
Apply Beacon 3 – in -1 adhesive or Zip Dry they both work just as good to your decorative paper and adhere to the scalloped frames.  A good tip is to use a sanding block to sand off the edges of the paper that may hang from the edges.  This also gives it a more distressed look!  Once you have distressed with the sand block use a Distressing Ink like Tim Holt’s to distress the edges of the frames/paper.
STEP FOUR:
Distress the Edges once they are all adhered to the wood frame.
STEP FIVE:
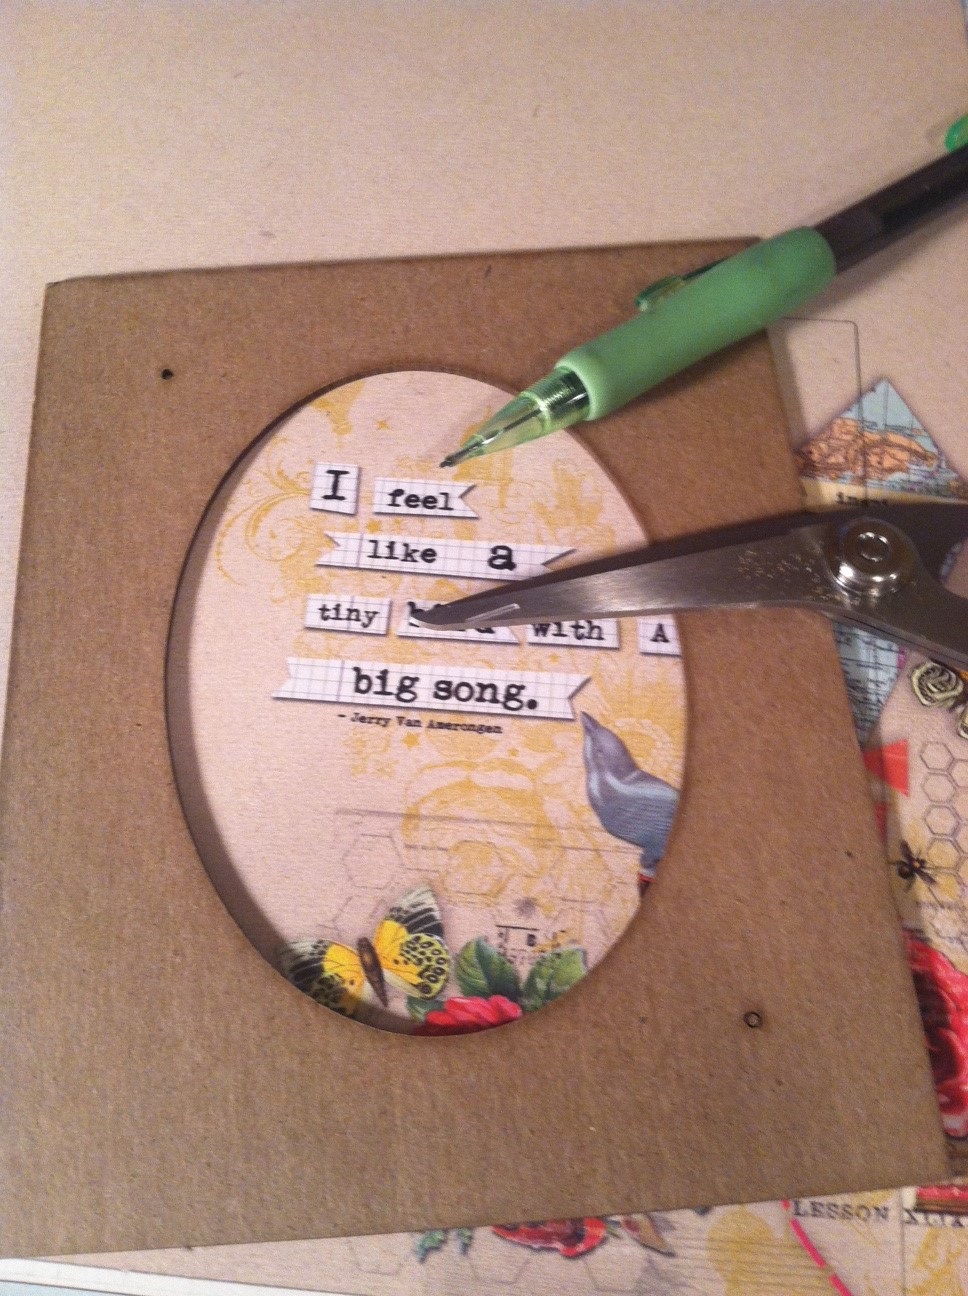
My favorite part is decorating.  These are 3D frames from Want2Scrap and I painted and applied glitter and glue.  I also used Buttons Galore and More Flutterbug Medley Buttons to accent the plaque and threaded a piece of seam binding to the buttons.
Instructional material 5
I used my Fiskar scissors to cut out another piece similar to the one above to give it the dimensional look.
Finally, to top finish this project I added a few of my favorite things, which are buttons, bling, and seam binding.  I gathered a few buttons that I had laying around added that along with Want2Scrap Musical Chef charm.

Thursday, April 25, 2013

Totally Shabby Rose Garden Birdhouse

As a Design Team member of Buttons Galore & More, we were given a Buttons & Birdhouses Designer Challenge.  Now, it wasn't your ordinary birdhouse like the kind that looks like a typical house, instead it was a bit of a challenge.  The idea is that we would all design this house with Buttons Galore & More buttons with a twist of what we would like to see in a birdhouse.

This Buttons & Birdhouses Designer Challenge runs from April 26 - 28th and I will be linking in with Buttons Galore & More website.  If you are a follower of Buttons Galore & More I strongly encourage you to vote for your favorite birdhouse.  One random commenter on the Buttons Galore & More's blog will be win a $10 Starbucks Gift Card and a pair of Fiskars Scissors!!!  Make sure you are following Buttons Galore & More on Facebook and Twitter.

So, let me get back to that birdhouse.  I enjoy a challenge and this project was just that, because I didn't start off with a typical style birdhouse, let's just say that I started out with a birdhouse that was rounded almost like a cylinder.  My first impression was oh this will be fun, but as I started to work with the birdhouse, I ran into the problem that it was not straight it was rounded or cylinder shape.  Anyway, I took on the challenge with a shabby approach and let's just say that I made a Totally Shabby Rose Garden Birdhouse, using the Rose Garden buttons from Buttons Galore & More!

Here is what I started out with and yes, I was quite clueless at first, because I wasn't sure if I was going to paint or what I wanted to create!
NOW do you see what I mean this shape was not easy to work with and it is about 5 1/5" tall and maybe 2 3/4"  round.  Not easy to work with, but I'm very happy with the end result! I was able to bling it out with Want2Scrap Swirl Rhinestones and add flowers too!

Now, keep an open mind, because I like to look at things quite differently and in my little world I enjoy lots of buttons, flowers, ribbon, bling, and lace, and I think if the world was made with those things, it would be such a lovely place.


My Totally Shabby Rose Garden Birdhouse is more for decoration purposes and it looks lovely in my craft room!!! I couldn't imagine a bird hanging out in my shabby birdhouse, but you know what I'm sure any bird with a sense of taste would love to hangout here!

MATERIALS USED FOR THIS PROJECT:

Other Products Used:
  • Want2Scrap - Pearl Swirl Rhinestones
  • Hot Pink Grosgain Ribbon
  • AdTech Hot Glue Gun
  • Shabby Chic Rose Trim - Walmart ($3.97/yd)
  • Offray Ribbon Trim 
  • Needle/Thread
  • Flower
  • Carte Bella - Paris Girl Collection
  • Acrylic Paint
  • Gesso
  • Measuring Tape
  • Mod Podge
  • Xacto Knife
  • Tim Holtz Distress Ink
I started out by applying Gesso to the birdhouse, because it was not a smooth finish, and my thought was to paint the birdhouse.  Well, I'm glad I didn't continue with that idea!  

I then measured the birdhouse to see how much paper I needed to cut my paper.  I determined where I needed to cut the circle for both the entrance of the birdhouse and the bird stand.  Now that was not easy what's so ever, but you will need a 1" circle punch.  I actually hand cut the circles with a xacto knife, because I didn't have a circle punch big enough to punch the circles out.

Once, I had all this figured out I then distressed my paper with Tim Holtz Vintage Photo Ink.  I then applied the Mod Podge to both the birdhouse and my paper that I cut and adhered the paper.

I wasn't sure if I was going to be able to apply buttons directly to the roof of the birdhouse because of the odd shape, but I tried and it was just not working for me.  With a needle and thread I sewed the Rose Garden buttons to the tip of my trim and glued the trim to the edge of my birdhouse.  I was still in the limbo with the roof of the birdhouse so, I decided to take a trip to my local Walmart and picked up this Ivory white shabby rose trim and with the AdTech Glue Gun I started to apply that to the roof.

I glued the Rose Garden buttons to the shabby rose trim and a ribbon to the top.  The rope that was attached to the birdhouse was not attractive so I disguised it with grosgain ribbon!

The rest of my birdhouse I decorated using Want2Scrap bling, flowers that I picked up at a local shop.  When you live in a small town as this one, you don't have a lot of craft stores to select from; in fact all we have is a Walmart, Kmart, and Quilting Store, which is where I go the most to pickup things that may help with my projects.  The nearest craft store is about 3 hrs away, so I have to work with what I have.

I hope you enjoyed my Totally Shabby Rose Garden Birdhouse, be sure to checkout Buttons Galore & More website and choose your favorite Birdhouse for a chance to win a $10 Starbuck Gift Card!

ALSO here are the blogs of the other Designers who are participating in this Buttons & Birdhouse Challenge, be sure to stop by there and leave a comment as well.

  1. You are here:  www.creandocondetalles.blogspot.com  NEXT GO TO:
  2. Buttons Galore & More:   http://wp.me/p2hPby-1No  (DON"T FORGET TO SELECT YOUR FAVORITE BIRDHOUSE!)
  3. Allie Gower:  http://www.MyCardParty.com
  4. Holly Gagnon: http://www.ribbonsandglue.com/
  5. Angie Holden:  http://www.ribbonsandglue.com/
  6. Melony Bradley:  http://www.ribbonsandglue.com/
  7. Laura Kelly: http://www.laurakellydesigns.com/laurakellydesignsblog/
  8. Jen Goode:  http://www.jgoodedesigns.com/
  9. Tracey McLennon:  http://scrappychick101.blogspot.ca/\
  10. Laura Bray:  
  11. Carla Schauer:  http://carlaschauer.com/


Wednesday, April 24, 2013

EXPLOSION Card

Recently Terri Sproul should us some awesome explosion cards that were just stunning, and I wanted to try to see if I could make some.  Now she purchased her cards from www.thepapercut.com, and they are just awesome, but since more of my viewers are from Latin America and they can't all purchase these, so they asked if I could teach this to them.

So, here is what I created using Terri Sproul's technique.


Now, I thought you could use either side for the front of the card, so for my next card, I decorated it using the diamond shape for the front. Here is my other explosion card.


They are actually very easy to make and it doesn't take a whole lot to make these cute cards.  I started out with a 12 x 12 piece of cardstock that I cut down to 4 x 12".  Now you will need a score board for these cards because in order to get the lines scored properly it's best to use a score board like Martha Stewarts.

Once you have your paper cut go ahead and score your paper at 2", 4", 6", 8" & 10".  Score again from the 6" score mark to the 2" mark and once you scored it will almost look like an "X".  You will do that on both sides.  Make sure you do not score you two side pieces that measure 2" each, which if you look to my first card it's the opening part of my card.

Materials Used:


Now, the fun part was decorating these, and I love this part, because I get to play with my favorite things Bling, Buttons, & Flowers.

Well, be sure to checkout my ustream and YouTube videos on these and other tutorials, just look for Creando_con_Detalles (Facebook) or Creando con Detalles (Youtube).

Also, from April 26 - 28th, I will be participating in a Buttons & Birdhouse Designer Challenge, so stop by Buttons Galore & More website for more details.

See you soon!


Wednesday, April 17, 2013

Shadow Box & Memories

My husband's grandfather recently past away and he was given a lot of his WWII pictures, which I created a Shadow Box.  My husband was so proud of his grandfather and the fact that he served during WWII.  His grandfather served as a Captain in the Army and was stationed in Japan.

We got so many awesome pictures of Japan and the soldiers, but I wanted to create something that we could cherish forever.  As many of you already know, I love bling and I totally love Want2Scrap's bling.  Not only are they affordable, but they are the best in the market.

I used several things to create this shadow box, but I wanted to keep as simple as possible, because my husband's grandfather was not one that liked to brag about his time in the service. 


I purchased the shadow boxes already painted from Scrapbook USA Expo this past March, and they are about 8 x 8", but perfect for this project.


MATERIALS USED:

Painted the Antique Hardware with black acrylic paint and embellished it with Want2Scrap's 72 count LeCreme Pearls.

I used burlap and Tim & Season's paper collection to give the picture that vintage look.

I was a bit nervous, because after all they are original pictures and I don't normally like to show pictures of my family especially after a lot of harassment by individuals that do not have anything better to do with their time, but I think that my husband was very proud of his grandfather and it was just perfect after all the heartaches he and his family has had to encounter these past several months.

When using originals just be sure that you preserve them well and that you make at least several copies just in case there is an accident to the original.  You never know with inks how the pictures will do, so I recommend making copies.

I hope you enjoy these Shadow Boxes and be sure to stop by Want2Scrap for your next bling purchase. www.want2scrap.com

Tuesday, April 9, 2013

Love U Card using Buttons Galore and More

Hi, Ladies, so sorry that I have not been able to post, but I have been very sick for the past three weeks.  I guess I should be trying to take things easy and relaxing alot more than I do, but it's hard to do.

I want to share with you all a lovely card I created using Buttons Galore & More lovely Rose Garden Buttons.


The card itself is 5 1/2 ” x 6″, and I wanted to use colors that would blend well with the lovely buttons that I received from Buttons Galore & More.  I think that when selecting colors for any project it should be something that blends and mix well and that just gives the project a gorgeous look once you are done.  Now, I am not a master of mixing and matching colors, and in fact I often like to through things in that don't mix or match, but for the most part I do try to blend things.
As part of my DT package from Buttons Galore & More I received gorgeous Rose Garden .
As, I created my card,  I wanted something that was going to say I love you whether it was Easter, Valentine’s or whatever holiday it was!  I think that it doesn't have to be Valentine's for you to say a simple I love you, so that is why I made this card.  I wanted something that was springy yet said, I love you no matter what occasion it may be.  The paper collection I chose for this card is from Authenique Anthologie  collection and it blended extremely well with my Rose Garden buttons.
Regardless of what holiday it maybe, a simple card could warm up anyone’s day.


I love to throw some of my all time favorite things to my cards.  I love using flowers, lace, ribbons, buttons, and lets not forget Want2Scrap bling.  I think that no project is not complete unless you use those items.


Materials used to make this Rose Garden Buttons Card:

Cross Promotional Supplies Used to make Rose Garden Buttons Card:

Additional Materials used to make this Rose Garden Buttons Card:

  • Want2Scrap - Pearl Swirl bling
  • Want2Scrap Charms
  • Authenique Antologie Paper Collection
  • Lace any lace will do
  • Seam Binding Ribbon
  • Canvas Corp Mixed Media Pack
  • Wild Orchard Paper Roses
  • Hemp
  • Hot Glue
  • Glue Dots
Thank you for stopping by today, I hope you enjoyed this Rose Garden Buttons Love U Card that is perfect for any occasion.
Now be sure to stop by Buttons Galore & More and check out their buttons line and other quality products.  

Friday, March 22, 2013

A Mother's Love Canvas


For those that don't know me, I lost my mom to cancer in 2008, and she is the reason why I started my paper crafting passion.  What started to be something that I wanted to learn how to create a simple album to hold all her lovely memories turned into a total paper crafting passion.

A Mother's Love is something I created using some of the things my mom loved and enjoyed as an inspiration.  My mom had a passion for flowers, and I have never had a green finger, but I truly enjoy flowers that are made out of paper, they are totally easy to maintain, and I don't feel guilty if they die.

I wanted to created almost like an illusion of my mom.  It's been several years since she past away, and those first couple of years, it was very hard for me.  Seems like every time I closed my eyes she was there and I missed her terribly, but now I have to try to remember how she looked and how she talked, because they are slowly fading away.

My mom wasn't big into makeup, she was when she was much younger, but as she became a mom, she did less of makeup and more into her natural beauty.  In fact, I still remember how flawless her skin was.  She had gorgeous skin, and maybe it was due to her no wearing tons of makeup.  She lathered her skin with moisturizer, and I hated being reminded to moisturize, but now I just wish I had listened.  My mom was great gardener, she could literally make any plant come to life.  She definitely had a green thumb, where as I had a thumb that would kill just about any living plant.

To begin my project I tried to focus on the things she enjoyed and things she didn't like.  For instance, my mom would never have been caught dead in a dress, I think in my life time I recall her wearing a skirt only once.  She was never fond of anything with flower prints, so to spice it up, I added her favorite and not so favorite just because I can now play dress-up.  As I worked on this piece all I could think of was boy is she mad at me for dressing her up in a flowery dress, but since it's my art I think I can do it!


Materials Used:
  • Sakura Hobby Craft - Terri Sproul Shimmer Mixers
  • Sakura Hobby Craft - 3D Crystal Lacquer
  • Gesso
  • Modge Podge
  • Scraps of pattern paper
  • Want2Scrap - Frilly Flourish Swirl White Pearls
  • Prisma Color Water Color Pencils
  • Chicken Wire Stamp
  • Scripture Stamp
  • Acrylic Paint Various Colors
  • Daler Rowney Watercolor pad
  • Daler Rowney Simply  Oil Pastels
  • Kraft Paper
  • Distressing Ink
  • Cotten Ball
  • Writer Archival Quality Pigment Ink Pen
  • 8 x 10 Daler Rowney Canvas
  • Sharpie Fine Point Black Marker
  • Brushes

My mom had big eyes, so I began drawing her face as I remember her on watercolor paper. I drew a somewhat's of a circle with a pencil and filled in the face.  Once you have drawn in the face.  Apply some Gesso allow to dry. Once dry you can start coloring in with your Prisma watercolor pencils.

Remember this is your drawing and it doesn't have to be perfect, but to tell you a short story, in 2001 my mom had collagen inserted into her lips.  My mom had beautiful lips prior to the collagen but she wanted her lips fuller, and the look on my face when I saw her come home with big thick lips was something I will never forget.  


Ok, so here is her in a skirt and trust me she wasn't one to wear skirts.  


If you look carefully the face is 3D and that is because my last step to creating the face was to apply Sakura's 3D Crystal Lacquer to the entire face and letting it dry for several hours.   


Once you have the face complete you can move on to playing dressup with scrap pieces of paper.  I used Sakura's Terri Sproul shimmer mixers to my mom's dress to give it more of a shimmery look and to top it off I applied a piece of trim.

Now the canvas is a Daler Rowney 8 x 10 canvas, and I prepped it up using some Gesso!  Once the Gesso dried up I started to paint.  I used various colors of acrylic paint and to my orange paint I applied a bit of Terri Sproul's Shimmer Mixers which I added a bit of Sakura's 3D Crystal Lacquer, it gave it a glazed shimmer look.

The butterflies I cut out pieces from BoBunny's Country Garden Collection applied some Sakura 3D Crystal Lacquer allowed to dry for several hours and I had a eye popping 3D butterfly.  Prior to applying the Lacquer I dabbed the butterflies with some of Terri Sproul's Shimmer Mixer to give them some shimmer as well, then I coated with the 3D Lacquer.

Can you just see how it shimmers with Terri Sproul's Shimmer Mixers LOVE IT!

It doesn't have to be completed perfect because remember it is mixed media and it's suppose to be fun, not perfect.

I used random stamps that I had to stamped the canvas once I had adhered the pattern paper to the painted canvas.  I also had to throw in some of Want2Scrap Frilly Flourish Swirl White Pearls.  My mom loved jewelry so I had to make sure I added some of her favorites.  Now, she didn't like eyeshadow but that was just me playing dressup and it was fun to do.


I made the heart also using Terri Sproul's Yellow Shimmer Mixer and mixed with Sakura's 3D Crystal Lacquer.  I hope you enjoyed my A Mother's Love Canvas!  

Be sure to visit http://www.sakuracraft.com and take advantage of their coupons!

Thursday, March 21, 2013

Want2Scrap Design Team

Well, as many of you already know I am the new Design Team member for Want2Scrap.  I'm super excited about this new journey/adventure.  I love designing but not as much as I love Want2Scrap's bling and products.

You know I always say that the supplies you use for your craft projects makes a huge difference, and it's definitely a true statement.  When you are shopping for things to make your next project think of things that will say BAM, and Want2Scrap does just that.  From their blings, to their chipboard, to their charms everything they carry definitely says that they are TOP Quality, which equals a TOP Notch Project!

So, join me in my new adventures as I create, bling, and share with Want2Scrap!

Here is something I just created using their AWESOME Frilly Flourish Swirl White Pearl BLING!!! Now what girl won't want to step out looking like she owns the runway!


Cute, Adorable, and definitely Want2Scrap bling!  Check out Want2Scrap at www.want2scrap.com and add these swirls to your shopping cart!


Tuesday, March 19, 2013

Pretty Girl Baby Onesie

So, I wanted to make something a bit different with my Baby Onesies, and of course, I couldn't finish my project without using some of my all time favorite products.  For this card I couldn't help but to use Buttons Galore & More Pretty Girl Brads.  The brads were just perfect for this project!

Now if you look at this Pretty Girl Onesie it has a tutu that I made out of toule and trim.  I love how this card turned out.


Let's talk about some of the things I used to create this Pretty Girl  Onesie card.  

Materials Used to Create this Pretty Girl Onesie Card:
To create this card just follow my tutorial that can be found via Want2Scrap's blog at http://want2scrap.com/blog/ or their ustream channel http://www.ustream.tv/new/search?q=want2scrap.
The technique is the same just play around with the toule and I found that the best way is to do a running stitch and adhere to the card.  Once you have it glued to the card just hot glue the trim to cover up the running stitch at the top of the toule.  for the Pretty Girl brad I snipped the back of the brad in order to adhere it to the card, it just made it better than trying to punch a hole to the card.  Once I snipped the back of the brad I adhered to the card using hot glue.  

Now you know no card is fairly complete unless I add bling so to top this card I used Want2Scrap Maxxi Girl Pearl Swirl and one of their newest products which is the crown charm that you see at the top of the sleeve.

I hope you enjoyed this take on my baby girl onesie wearing a tutu!  Be sure to check out Buttons Galore & More and Want2Scrap!


Monday, March 18, 2013

How to create a Baby Onesie Card


I love creating things that are cute, simple, and yet fun to make.  Last Friday, I had my very first class via Want2Scrap's ustream channel and we created a cute onesie card using Want2Scrap new charms.  I like to think outside the box and when I see something I think of unique ways to use it, and that is exactly what I did with Want2Scrap new charms.
When you think of charms you immediately think about using them in either a necklace or bracelet, but what we did this past Friday was to create a cute onesie card that is perfect for any expecting mother or birth announcement.  There are so many things you can create with charms and to be honest the sky is the limit.  You just need to think outside the box, and Want2Scrap makes it very easy for you to do just that!
So, exactly how do you create a onesie card?  Honestly it's very simple and with a few simple steps you will be on your way to creating cute onesie cards that will WOW everyone.
Here is what we created together Friday night:
blue onsie stork
blue onsie2
How do you create this cute onesie card, well here is what you need to get started:

Materials Used to Create a Baby Onesie using Want2Scrap Charms:
The first thing you need to do is to gather all your supplies and then think baby!
Here are the steps:
Step One cut cardstock 5 x 11" and score at 5 1/2".
Onsie measurements

Step Two:  Cut 4 pieces of your designer paper at 5 x 5/12" and adhere to card.
Step Three:  Once the four pieces of designer paper has been adhered, cut your semi circles like shown below.  I used a mason jar and drew my semi circles.  Make sure your Designer paper is already adhered to your cardstock before you begin drawing and cutting.
onsie measurement2
Step Four:  Cut out your semi circles, be sure to use either an xacto knife or a good pair of paper cutting scissors.    Once you do that measure on both sides 1 1/2" from top and make a small mark and then from the marks measure in and draw a line on both sides 1 1/2" like you see in the photo.  Then  make a line that almost looks like the number 7 (line is end to end) . Cut those out and you can now see how the Onesie had taken form.
onsie measurement4
onsie measurement5

Now, you can start dressing up your onesie card.  What I did was to glue the trim around the legs, necklines, and sleeves with trim.  I used hot glue and you will have to work pretty fast on this part.  Then I used the semi circle that was cut out from the neck as the flap for my pocket on the onesie.  Great way of recycling and working with what we already have.  I used Buttons Galore & More Baby Boy button and attached Want2Scrap boy charm to the backing of the stork button.  I applied my pocket, flowers, and ribbon, before I adhered the Maxxi Girl Pearls.  I find it alot easier to apply my bling once everything is in place
So, there you have it.  A cute and simple Baby Onesie using Want2Scrap Charms and Bling!  Now what baby wouldn't want to rock this onesie out!

Thursday, March 7, 2013

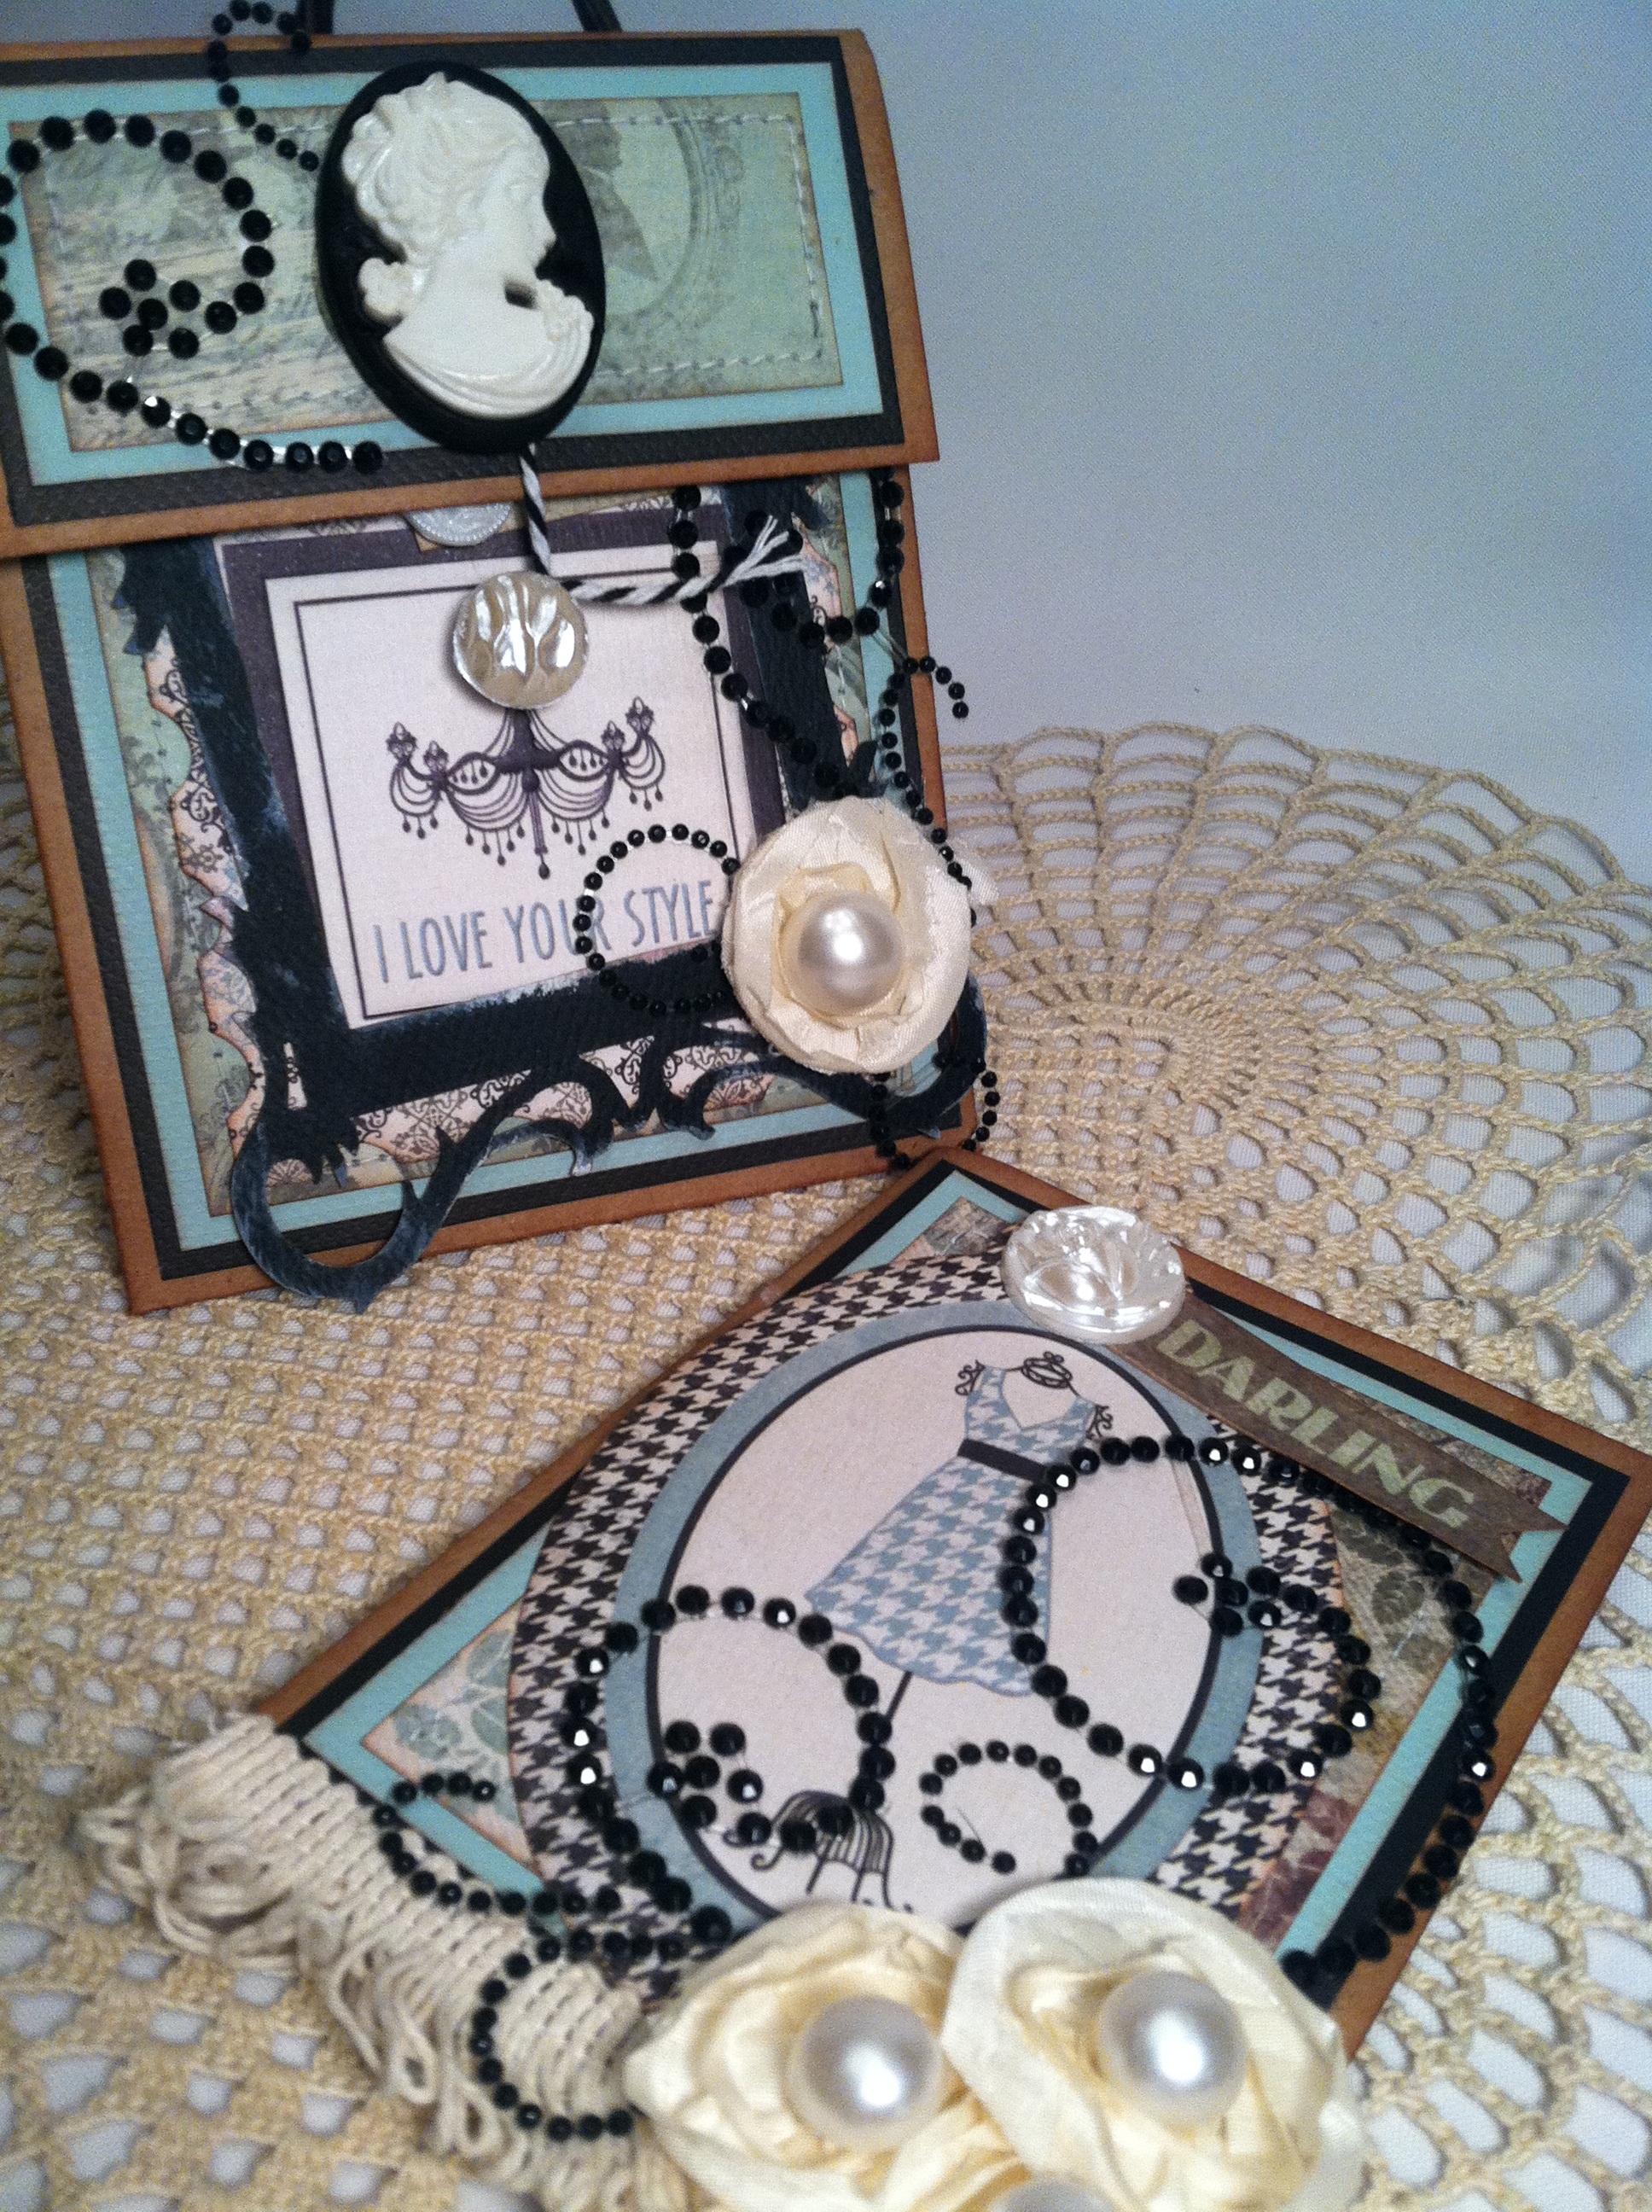
Create an Antique Chic Cameo Button Envelope and Card


Create an Antique Chic Cameo Button Envelope and Card with a few easy steps.  Its just so simple that with a few easy supplies you can create an envelope that will wow anyone.
I'm  Design Team member for Buttons Galore & More, and part of my DT package I got some awesome cameo buttons that are just gorgeous.
There is so much you can create with Cameo Buttons.   When, you think of buttons you immediately think about things like shirts or some type of sewing project, but the truth is that you can  create anything with buttons.  Honestly, the sky is the limit when it comes to buttons. The project that I created for you today is an envelope and card using Cameo Buttons as closures.  Buttons Galore & More made this project super fun for me, because the Cameo Buttons and  Haberdashery Buttons were gorgeous and I found the perfect paper to go with it from We R Memory Keepers “Antique Chic”.  This paper collection went very well with the Cameo Buttons!  To create this project it was super fun and super easy.
Antique Chic Cameo button

Ingredients for making the Cameo Button Envelope & Card:

Buttons Galore & More Products used:

Promotional Products Used:

  • Clearsnap ColorBox Black Cat’s Eye Archival Dye
  • Clearsnap Cat’s Eye White Pigment
I also used:
  • Kraft Paper (Hobby Lobby brand)
  • We R Memory Keepers Antique Chic Paper Collection
  • Hot Glue/Sticks
  • Maya Road Black Twine
  • Tim Holtz Vintage Photo Distress Ink
  • Scor Tape
  • Want2Scrap Fancy Frame
  • Want2Scrap Black Rhinestone Swirl
  • Ad Tech Glue Runner adhesive
  • Paper Studio Fibers
  • Karlas001 Rosette Ribbon
  • Sewing Machine
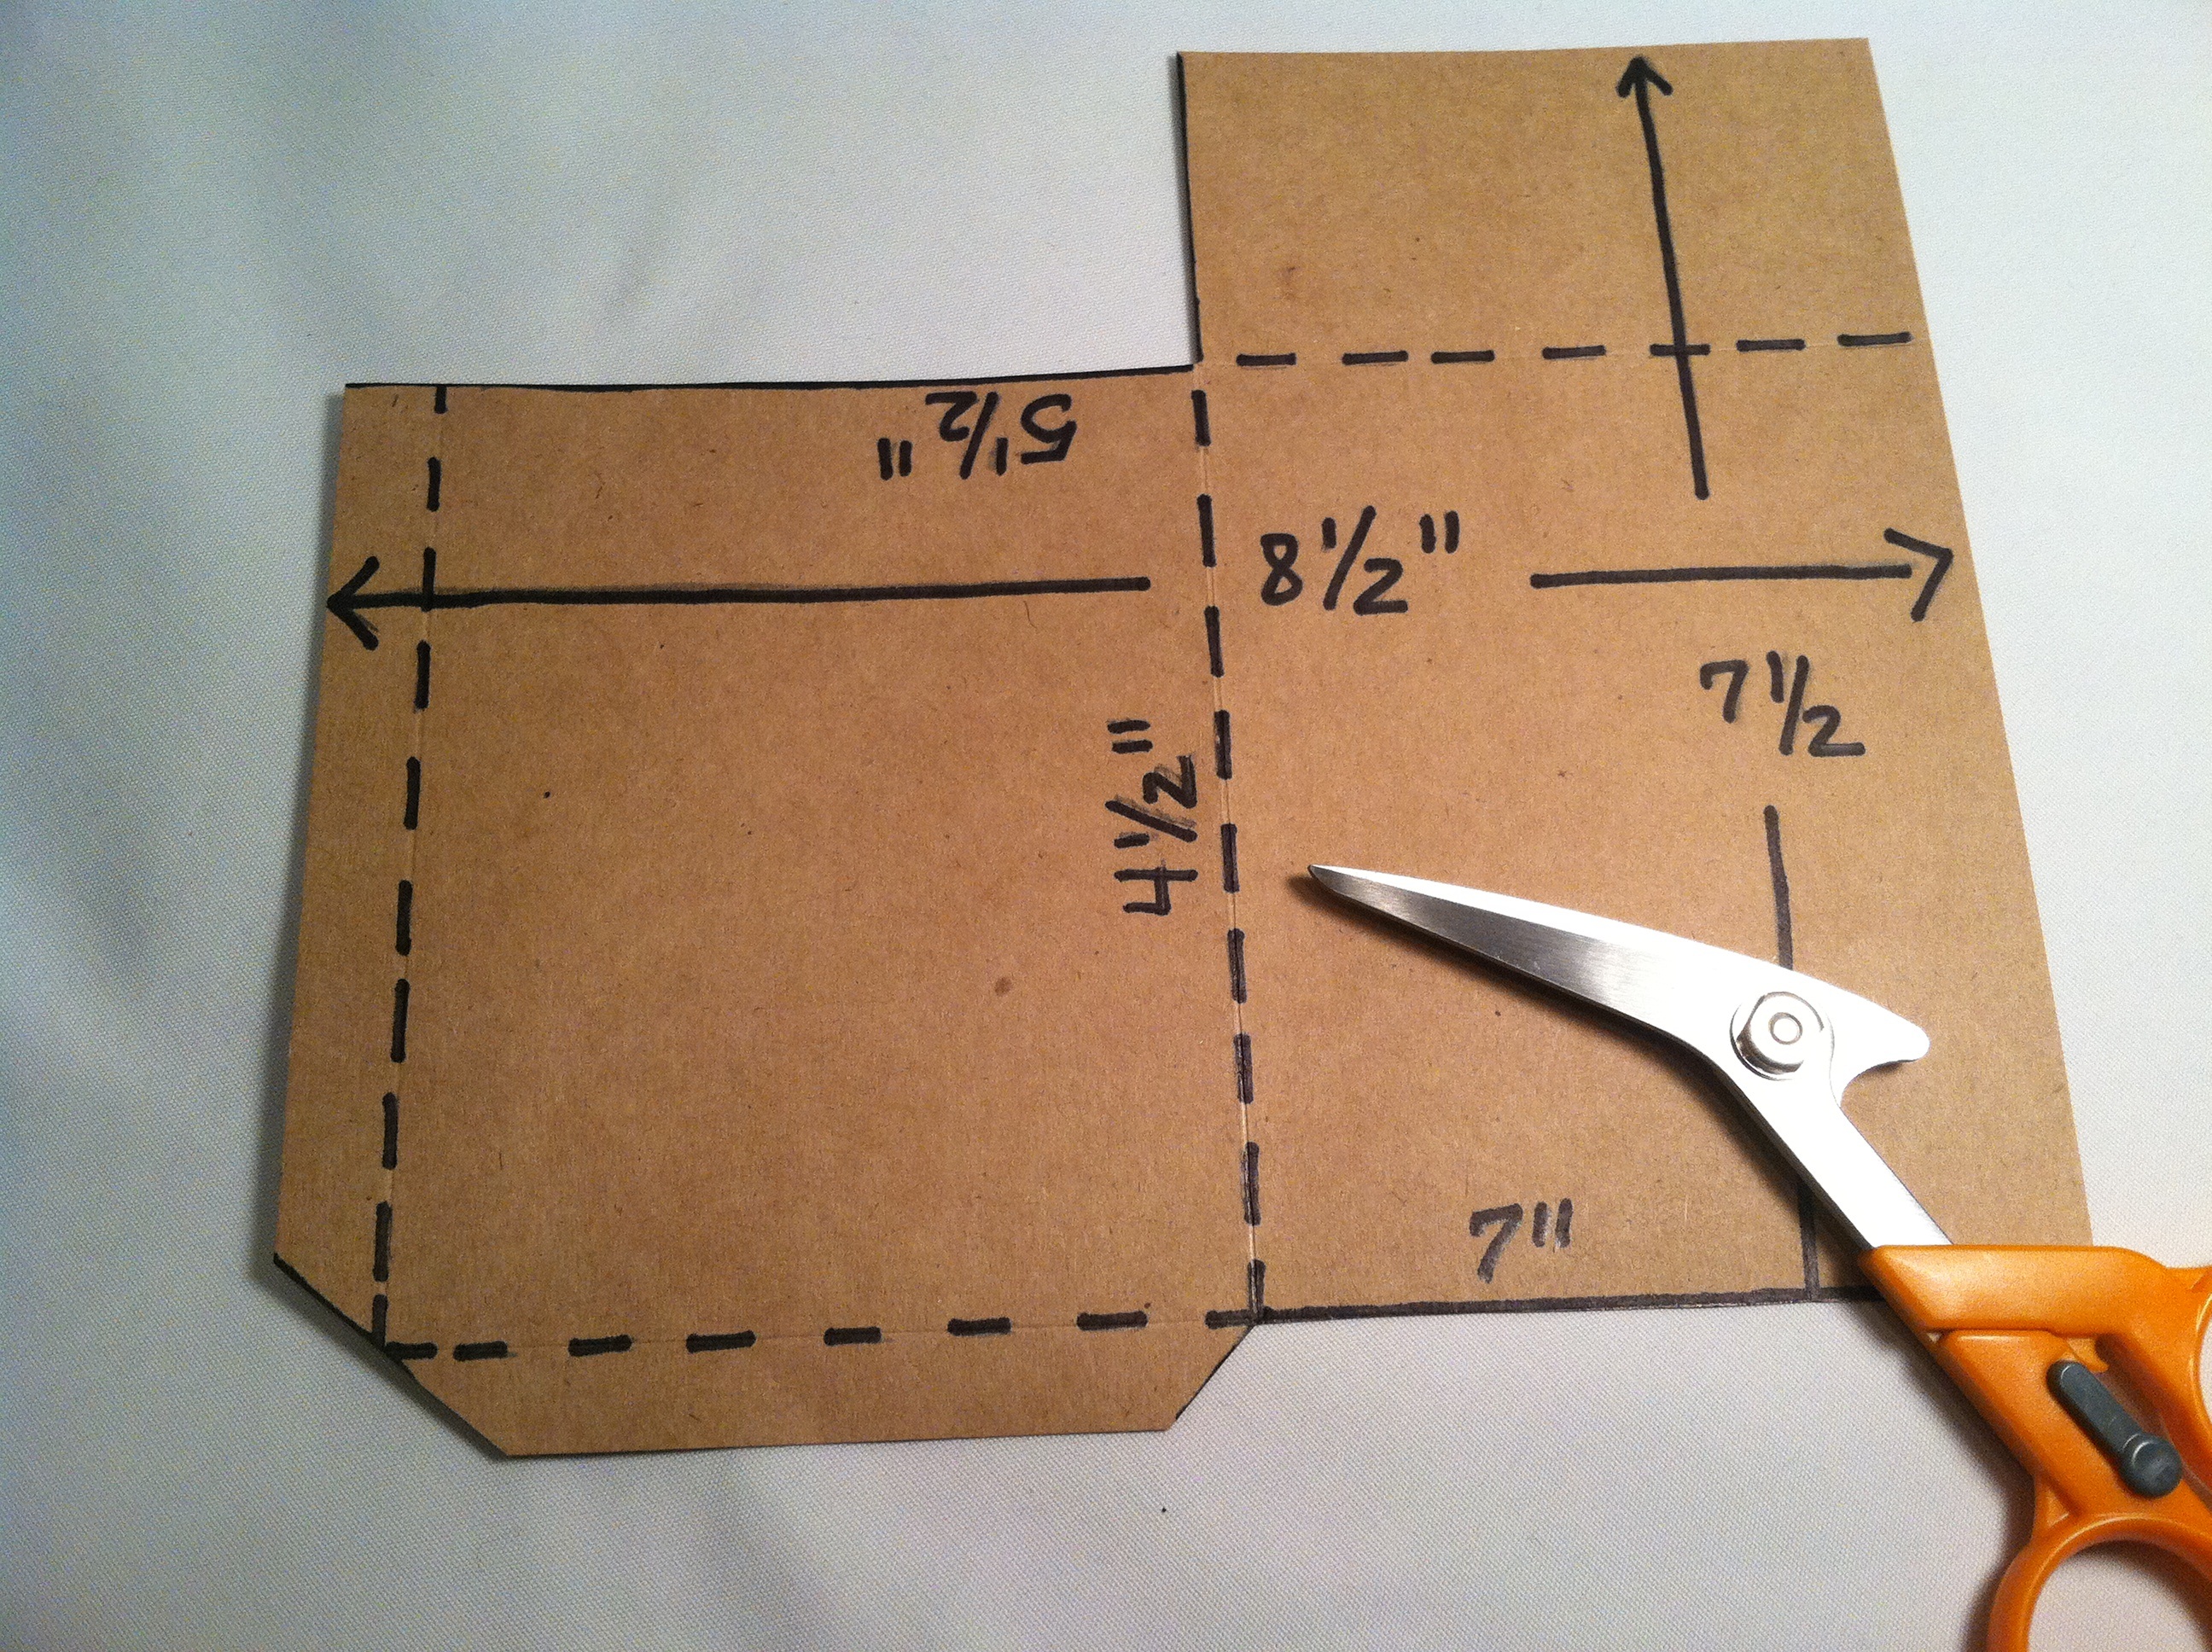
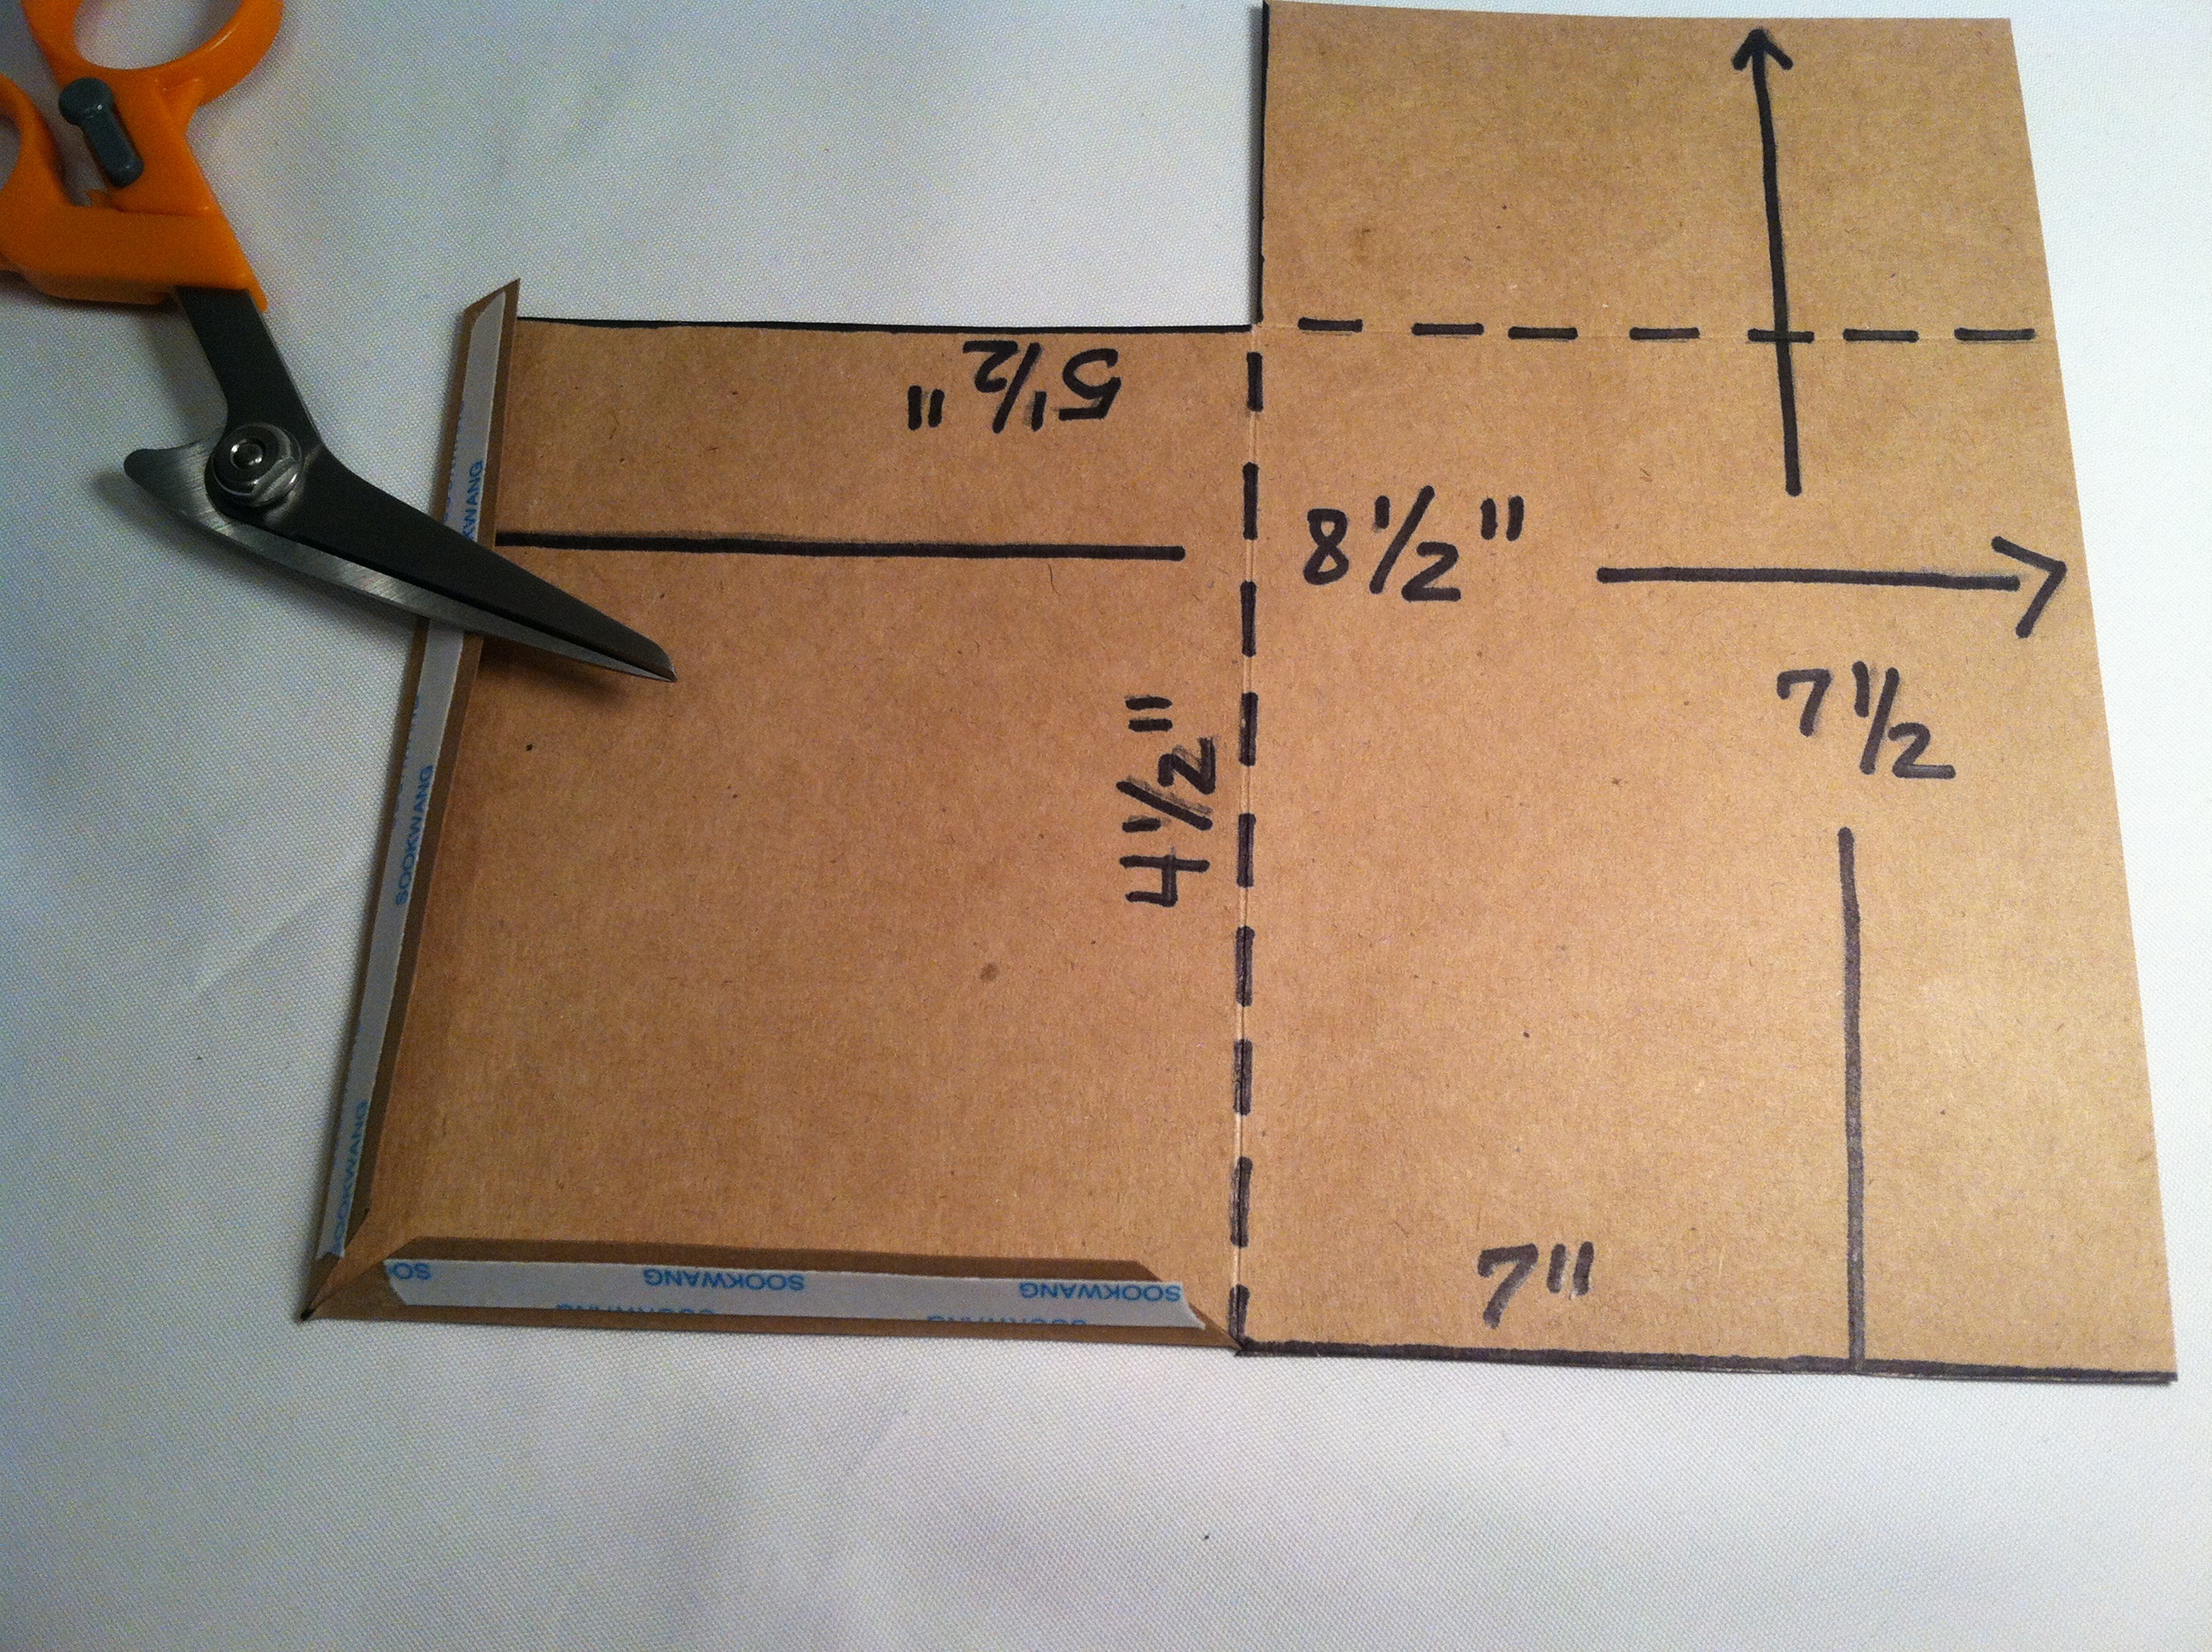
The envelope itself is 4 x 5″ and the card is 3 1/2 x 4 1/2″.  To give it a more elegant look I used a sewing machine and stitched the layers.  I hope you enjoy the video I created showing you how to create this beautiful envelope and card using Buttons Galore & More Cameo  & Haberdashery Buttons.  Be sure to visit Buttons Galore & More website for your buttons at www.buttonsgaloreandmore.com.

Directions for creating the Envelope and Card:

Step One:
Envelope measurements
Step Two:
envelope measurement2
Step Three:
envelopement measurement3
Here is a link to my video tutorial:

Visit Buttons Galore and More at www.buttonsgaloreandmore.com  I hope you enjoyed my first project!

Tuesday, February 26, 2013

Cards for Special Occasions

I was very inspired today to create several cards.  I actually made a total of three using different pattern papers.  They each have a unique style to them, but very elegant in their own way.
My first card is for a special MOM, and my mom is my little angel but it's something that she would have loved and enjoyed.  It's approximately 5 1/2  x 5 1/2" and I used Old Stack from DCWV and of course White Pearl Swirls from Want2Scrap and some wooden buttons.


I distressed the edges of the pattern paper and used a travel stamp to give more details to paper stack.
Now what mom wouldn't love this card!

The next card is using My Mind Eye's Pattern Paper, buttons, flowers, ribbon, and 
Want2Scrap 
Tricycle Chipboard  
Pearl Nestabling


My last card for the day is approximately 5 x 6" and it's incredibly very gorgeous.  I used a Vintage pattern paper RETIRED from CTMH.  I loved the colors and all the flowers and blings it really pulled this card very well together.


I hope you enjoyed my cards that I created for you today  and be sure to stop by again and PLEASE leave me a comment!